
Flutter 屏幕采集实战
在视频会议、线上课堂、游戏直播等场景,屏幕共享是一个最常见的功能。屏幕共享就是对屏幕画面的实时共享,端到端主要有几个步骤:录屏采集、视频编码及封装、实时传输、视频解封装及解码、视频渲染。一般来说,实时屏幕共享时,共享发起端以固定采样频率(一般 8 - 15帧足够)抓取到屏幕中指定源的画面(包括指定屏幕、指定区域、指定程序等),经过视频编码压缩(应选择保持文本/图形边缘信息不失真的方案)后,在实时网
一、概述
在视频会议、线上课堂、游戏直播等场景,屏幕共享是一个最常见的功能。屏幕共享就是对屏幕画面的实时共享,端到端主要有几个步骤:录屏采集、视频编码及封装、实时传输、视频解封装及解码、视频渲染。
一般来说,实时屏幕共享时,共享发起端以固定采样频率(一般 8 - 15帧足够)抓取到屏幕中指定源的画面(包括指定屏幕、指定区域、指定程序等),经过视频编码压缩(应选择保持文本/图形边缘信息不失真的方案)后,在实时网络上以相应的帧率分发。
因此,屏幕采集是实现实时屏幕共享的基础,它的应用场景也是非常广泛的。
现如今 Flutter 的应用越来越广泛,纯 Flutter 项目也越来越多,那么本篇内容我们主要分享的是 Flutter 的屏幕采集的实现。
二、实现流程
在详细介绍实现流程前,我们先来看看原生系统提供了哪些能力来进行屏幕录制。
1、iOS 11.0 提供了 ReplayKit 2 用于采集跨 App 的全局屏幕内容,但仅能通过控制中心启动;iOS 12.0 则在此基础上提供了从 App 内启动 ReplayKit 的能力。
2、Android 5.0 系统提供了 MediaProjection 功能,只需弹窗获取用户的同意即可采集到全局屏幕内容。
我们再看一下 Android / iOS 的屏幕采集能力有哪些区别。
1、iOS 的 ReplayKit 是通过启动一个 Broadcast Upload Extension 子进程来采集屏幕数据,需要解决主 App 进程与屏幕采集子进程之间的通信交互问题,同时,子进程还有诸如运行时内存最大不能超过 50M 的限制。
2、Android 的 MediaProjection 是直接在 App 主进程内运行的,可以很容易获取到屏幕数据的 Surface。
虽然无法避免原生代码,但我们可以尽量以最少的原生代码来实现 Flutter 屏幕采集。将两端的屏幕采集能力抽象封装为通用的 Dart 层接口,只需一次部署完成后,就能开心地在 Dart 层启动、停止屏幕采集了。
接下来我们分别介绍一下 iOS 和 Android 的实现流程。
1、iOS
打开 Flutter App 工程中iOS 目录下的 Runner Xcode Project,新建一个 Broadcast Upload Extension Target,在此处理 ReplayKit 子进程的业务逻辑。
首先需要处理主 App 进程与 ReplayKit 子进程的跨进程通信问题,由于屏幕采集的 audio/video buffer 回调非常频繁,出于性能与 Flutter 插件生态考虑,在原生侧处理音视频 buffer 显然是目前最靠谱的方案,那剩下要解决的就是启动、停止信令以及必要的配置信息的传输了。
对于启动 ReplayKit 的操作,可以通过 Flutter 的 MethodChannel 在原生侧 new 一个 RPSystemBroadcastPickerView,这是一个系统提供的 View,包含一个点击后直接弹出启动屏幕采集窗口的 Button。通过遍历 Sub View 的方式找到 Button 并触发点击操作,便解决了启动 ReplayKit 的问题。
static Future<bool?> launchReplayKitBroadcast(String extensionName) async {
    return await _channel.invokeMethod(
        'launchReplayKitBroadcast', {'extensionName': extensionName});
}
- (void)handleMethodCall:(FlutterMethodCall*)call result:(FlutterResult)result {
if ([@"launchReplayKitBroadcast" isEqualToString:call.method]) {
[self launchReplayKitBroadcast:call.arguments[@"extensionName"] result:result];
} else {
result(FlutterMethodNotImplemented);
}
}
- (void)launchReplayKitBroadcast:(NSString *)extensionName result:(FlutterResult)result {
if (@available(iOS 12.0, *)) {
RPSystemBroadcastPickerView *broadcastPickerView = [[RPSystemBroadcastPickerView alloc] initWithFrame:CGRectMake(0, 0, 44, 44)];
NSString *bundlePath = [[NSBundle mainBundle] pathForResource:extensionName ofType:@"appex" inDirectory:@"PlugIns"];
if (!bundlePath) {
NSString *nullBundlePathErrorMessage = [NSString stringWithFormat:@"Can not find path for bundle `%@.appex`", extensionName];
NSLog(@"%@", nullBundlePathErrorMessage);
result([FlutterError errorWithCode:@"NULL_BUNDLE_PATH" message:nullBundlePathErrorMessage details:nil]);
return;
}
NSBundle *bundle = [NSBundle bundleWithPath:bundlePath];
if (!bundle) {
NSString *nullBundleErrorMessage = [NSString stringWithFormat:@"Can not find bundle at path: `%@`", bundlePath];
NSLog(@"%@", nullBundleErrorMessage);
result([FlutterError errorWithCode:@"NULL_BUNDLE" message:nullBundleErrorMessage details:nil]);
return;
}
broadcastPickerView.preferredExtension = bundle.bundleIdentifier;
for (UIView *subView in broadcastPickerView.subviews) {
if ([subView isMemberOfClass:[UIButton class]]) {
UIButton *button = (UIButton *)subView;
[button sendActionsForControlEvents:UIControlEventAllEvents];
}
}
result(@(YES));
} else {
NSString *notAvailiableMessage = @"RPSystemBroadcastPickerView is only available on iOS 12.0 or above";
NSLog(@"%@", notAvailiableMessage);
result([FlutterError errorWithCode:@"NOT_AVAILIABLE" message:notAvailiableMessage details:nil]);
}
}
然后是配置信息的同步问题:
方案一是使用 iOS 的 App Group 能力,通过 NSUserDefaults 持久化配置在进程间共享配置信息,分别在 Runner Target 和 Broadcast Upload Extension Target 内开启 App Group 能力并设置同一个 App Group ID,然后就能通过 -[NSUserDefaults initWithSuiteName] 读写此 App Group 内的配置了。
Future<void> setParamsForCreateEngine(int appID, String appSign, bool onlyCaptureVideo) async {
    await SharedPreferenceAppGroup.setInt('ZG_SCREEN_CAPTURE_APP_ID', appID);
    await SharedPreferenceAppGroup.setString('ZG_SCREEN_CAPTURE_APP_SIGN', appSign);
    await SharedPreferenceAppGroup.setInt("ZG_SCREEN_CAPTURE_SCENARIO", 0);
    await SharedPreferenceAppGroup.setBool("ZG_SCREEN_CAPTURE_ONLY_CAPTURE_VIDEO", onlyCaptureVideo);
}
- (void)syncParametersFromMainAppProcess {
    // Get parameters for [createEngine]
    self.appID = [(NSNumber *)[self.userDefaults valueForKey:@"ZG_SCREEN_CAPTURE_APP_ID"] unsignedIntValue];
    self.appSign = (NSString *)[self.userDefaults valueForKey:@"ZG_SCREEN_CAPTURE_APP_SIGN"];
    self.scenario = (ZegoScenario)[(NSNumber *)[self.userDefaults valueForKey:@"ZG_SCREEN_CAPTURE_SCENARIO"] intValue];
}
方案二是使用跨进程通知 CFNotificationCenterGetDarwinNotifyCenter 携带配置信息来实现进程间通信。
接下来是停止 ReplayKit 的操作。也是使用上述的 CFNotification 跨进程通知,在 Flutter 主 App 发起结束屏幕采集的通知,ReplayKit 子进程接收到通知后调用 -[RPBroadcastSampleHandler finishBroadcastWithError:] 来结束屏幕采集。
static Future<bool?> finishReplayKitBroadcast(String notificationName) async {
    return await _channel.invokeMethod(
        'finishReplayKitBroadcast', {'notificationName': notificationName});
}
- (void)handleMethodCall:(FlutterMethodCall*)call result:(FlutterResult)result {
if ([@"finishReplayKitBroadcast" isEqualToString:call.method]) {
NSString *notificationName = call.arguments[@"notificationName"];
CFNotificationCenterPostNotification(CFNotificationCenterGetDarwinNotifyCenter(), (CFStringRef)notificationName, NULL, nil, YES);
result(@(YES));
} else {
result(FlutterMethodNotImplemented);
}
}
// Add an observer for stop broadcast notification
CFNotificationCenterAddObserver(CFNotificationCenterGetDarwinNotifyCenter(),
(__bridge const void *)(self),
onBroadcastFinish,
(CFStringRef)@"ZGFinishReplayKitBroadcastNotificationName",
NULL,
CFNotificationSuspensionBehaviorDeliverImmediately);
// Handle stop broadcast notification from main app process
static void onBroadcastFinish(CFNotificationCenterRef center, void *observer, CFStringRef name, const void *object, CFDictionaryRef userInfo) {
// Stop broadcast
[[ZGScreenCaptureManager sharedManager] stopBroadcast:^{
RPBroadcastSampleHandler *handler = [ZGScreenCaptureManager sharedManager].sampleHandler;
if (handler) {
// Finish broadcast extension process with no error
#pragma clang diagnostic push
#pragma clang diagnostic ignored "-Wnonnull"
[handler finishBroadcastWithError:nil];
#pragma clang diagnostic pop
} else {
NSLog(@"⚠️ RPBroadcastSampleHandler is null, can not stop broadcast upload extension process");
}
}];
}
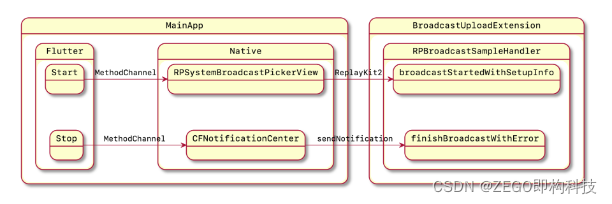
(iOS 实现流程图示)
2、Android
Android 的实现相对 iOS 比较简单,在启动屏幕采集时,可以直接使用 Flutter 的 MethodChannel 在原生侧通过 MediaProjectionManager 弹出一个向用户请求屏幕采集权限的弹窗,收到确认后即可调用 MediaProjectionManager.getMediaProjection() 函数拿到 MediaProjection 对象。
需要注意的是,由于 Android 对权限管理日渐收紧,如果你的 App 的目标 API 版本 (Target SDK) 大于等于 29,也就是 Android Q (10.0) 的话,还需要额外启动一个前台服务。根据 Android Q 的迁移文档显示,诸如 MediaProjection 等需要使用前台服务的功能,必须在独立的前台服务中运行。
首先需要自己实现一个继承 android.app.Service 类,在 onStartCommand 回调中调用上述的 getMediaProjection() 函数获取 MediaProjection 对象。
@Override
public int onStartCommand(Intent intent, int flags, int startId) {

    int resultCode = intent.getIntExtra("code", -1);
    Intent resultData = intent.getParcelableExtra("data");

    String notificationText = intent.getStringExtra("notificationText");
    int notificationIcon = intent.getIntExtra("notificationIcon", -1);
    createNotificationChannel(notificationText, notificationIcon);

    MediaProjectionManager manager = (MediaProjectionManager)getSystemService(Context.MEDIA_PROJECTION_SERVICE);
    MediaProjection mediaProjection = manager.getMediaProjection(resultCode, resultData);
    RequestMediaProjectionPermissionManager.getInstance().onMediaProjectionCreated(mediaProjection, RequestMediaProjectionPermissionManager.ERROR_CODE_SUCCEED);

    return super.onStartCommand(intent, flags, startId);
}
然后还需要在 AndroidManifest.xml 中注册这个类。
<service
    android:name=".internal.MediaProjectionService"
    android:enabled="true"
    android:foregroundServiceType="mediaProjection"
/>
然后在启动屏幕采集时判断系统版本,如果运行在 Android Q 以及更高版本的系统中,则启动前台服务,否则可以直接获取 MediaProjection 对象。
@RequiresApi(api = Build.VERSION_CODES.LOLLIPOP)
private void createMediaProjection(int resultCode, Intent intent) {
    if (Build.VERSION.SDK_INT >= Build.VERSION_CODES.Q) {
        service = new Intent(this.context, MediaProjectionService.class);
        service.putExtra("code", resultCode);
        service.putExtra("data", intent);
        service.putExtra("notificationIcon", this.foregroundNotificationIcon);
        service.putExtra("notificationText", this.foregroundNotificationText);
        this.context.startForegroundService(service);
    } else {
        MediaProjectionManager manager = (MediaProjectionManager) context.getSystemService(Context.MEDIA_PROJECTION_SERVICE);
        MediaProjection mediaProjection = manager.getMediaProjection(resultCode, intent);
        this.onMediaProjectionCreated(mediaProjection, ERROR_CODE_SUCCEED);
    }
}
紧接着,根据业务场景需求从屏幕采集 buffer 的消费者拿到 Surface,例如,要保存屏幕录制的话,从 MediaRecoder 拿到 Surface,要录屏直播的话,可调用音视频直播 SDK 的接口获取 Surface。
有了 MediaProjection 和消费者的 Surface,接下来就是调用 MediaProjection.createVirtualDisplay() 函数传入 Surface 来创建 VirtualDisplay 实例,从而获取到屏幕采集 buffer。
VirtualDisplay virtualDisplay = mediaProjection.createVirtualDisplay(“ScreenCapture”, width, height, 1,
DisplayManager.VIRTUAL_DISPLAY_FLAG_PUBLIC, surface, null, handler);
最后是结束屏幕采集,相比 iOS 复杂的操作,Android 仅需要将 VirtualDisplay 和 MediaProjection 实例对象释放即可。点击ZEGO RTC Flutter SDK 后边
三、实战示例
下面为大家准备了一个实现了 iOS/Android 屏幕采集并使用 Zego RTC Flutter SDK 进行推流直播的示例 Demo。
下载链接:https://github.com/zegoim/zego-express-example-screen-capture-flutter
Zego RTC Flutter SDK 在原生侧提供了视频帧数据的对接入口,可以将上述流程中获取到的屏幕采集 buffer 发送给 RTC SDK 从而快速实现屏幕分享、推流。
iOS 端在获取到系统给的 SampleBuffer 后可以直接发送给 RTC SDK,SDK 能自动处理视频和音频帧。
- (void)processSampleBuffer:(CMSampleBufferRef)sampleBuffer withType:(RPSampleBufferType)sampleBufferType {
    [[ZGScreenCaptureManager sharedManager] handleSampleBuffer:sampleBuffer withType:sampleBufferType];
}
Android 端需要先向 RTC SDK 获取一个 SurfaceTexture 并初始化所需要的 Surface, Handler 然后通过上述流程获取到的 MediaProjection 对象创建一个 VirtualDisplay 对象,此时 RTC SDK 就能获取到屏幕采集视频帧数据了。
SurfaceTexture texture = ZegoCustomVideoCaptureManager.getInstance().getSurfaceTexture(0);
texture.setDefaultBufferSize(width, height);
Surface surface = new Surface(texture);
HandlerThread handlerThread = new HandlerThread("ZegoScreenCapture");
handlerThread.start();
Handler handler = new Handler(handlerThread.getLooper());

VirtualDisplay virtualDisplay = mediaProjection.createVirtualDisplay("ScreenCapture", width, height, 1,
    DisplayManager.VIRTUAL_DISPLAY_FLAG_PUBLIC, surface, null, handler);
四、总结与展望
最后,我们来总结一下 Flutter 屏幕采集实现的主要内容。
首先从原理上要了解 iOS / Android 原生提供的屏幕采集能力,其次介绍了 Flutter 与原生之间的交互,如何在 Flutter 侧控制屏幕采集的启动与停止。最后示例了如何对接 Zego RTC SDK 实现屏幕分享推流。
目前,Flutter on Desktop 趋于稳定,Zego RTC Flutter SDK 已经提供了 Windows 端的初步支持,我们将持续探索 Flutter 在桌面端上的应用,敬请期待!


致力于链接即构和开发者,提供实时互动和元宇宙领域的前沿洞察、技术分享和丰富的开发者活动,共建实时互动世界。
更多推荐


 1
1 0
0- 0


 已为社区贡献257条内容

所有评论(0)